Saturday, February 23, 2019

Project Quilting Challenge 10.4 Pixel Play


My personal recipe for  happiness is "Someone to love, something to do and something to look forward to."  Participating in Project Quilting this season has filled my cup 2/3 of the way! I have loved having these projects to "do" as much as I have loved looking forward to the announcement of the next theme.  There's something so satisfying about getting the theme, then letting the creative juices flow.  The planning, the making, the problem solving..it's all good for my heart and soul.  This week our prompt was Pixel Play.  We were challenged to explore pixels in any way we chose. I sneaked a peek at my phone during brunch with friends on Sunday to check the challenge, pondered it on the drive home, and by that evening I had a plan and a start!

Image from Google.  Isn't it pretty?

After a bit of browsing through Instagram and Pinterest, I found a small pixelated image of a flower in a Google Image search and decided to go with that. It reminded me of a cherry blossom, and SPRING, which can't come soon enough!

I've never made a pixel quilt before, but I remembered reading a tutorial once, where the squares were fused to a backing, which was folded along the lines, and long , quick seams were sewn instead of a hundred teeny tiny seams.  I have searched and searched for a similar tutorial  to watch again and to post here, but can't find one.  If anyone has a good name for this method, please let me know!
Fusible Interfacing scrap from T-shirt quilt making.  Perfect!


After counting the squares in my image, I drew a grid on a scrap of fusible interfacing.  I decided to make the squares three quarters of an inch.  I found all of the colors I needed in my scrap baskets, and since I was making the squares small, I had plenty of each color!  I put them on a mini cake stand so they were close by and handy.  So cute!


I fused two rows at a time using just the tip of my iron.  Eventually, I switched to my mini iron, and had the whole image ironed down in a flash!  It was SO FUN!  It reminded me of the diamond painting project that my daughter worked on while she was in the hospital.  It's very calming to do something so repetitive and methodical.

 The fun continued as I folded and stitched my way across the grid!  It really is gratifying to play with a new technique and see it work!

Oh! That texture!  Squeeeeeee!


I LOVE the way the back of the piece looked after I had sewn the seams in both directions.  And it felt neat, too.  I ran a seam ripper down each fold of interfacing hoping to reduce the bulk and soften up the piece a bit.  I was pleasantly surprised at how quick this process was!  I will use this technique again, and, if I can find a tutorial to actually follow, I might even be able to do it better!

Once the piece was finished, I had a hard time deciding what it should become.  Somehow, it just didn't seem to want to be a mini quilt.  Mostly,  I think, because I didn't have any idea how to quilt it.  I certainly didn't want to try to stitch in the ditch, or even around the image with all those seams and that interfacing in there.  I thought about framing it, but that didn't feel right, either.  Finally, I settled on making it into a fabric basket.

That floral print is my all time favorite!  It's just a print from JoAnn many years ago, but I love it. It's almost gone, now!


I added two borders, one of which is my all time favorite fabric, and found a really pretty green print for the body of the basket.  That green fabric has been in my stash for a couple of years, and I've never done anything with it.  I have a LOT of it, so I must've intended it for a garment at one point.  I also had an untouched, purchased by mistake and never returned roll of Craft-Fuse that got called into action for this project!  I LOVE that I'm using this stuff!  I have not had to  buy a single thing for any of these challenges.  SO satisfying!


I'm not quite happy with the placement of the flower panel on the basket. There's a bit too much green on the top.  I had to fiddle and re-do and MATH a bit to get it where it is, and not on the bottom of the basket, though, this isn't too bad.   I also wish I had used white thread in the bobbin when top stitching around the top.  I just might take it apart one day and redo..especially if I decide to make this a  county fair entry this summer.  But, for now, I have a pretty little fabric storage basket that reminds me Spring is on the way.


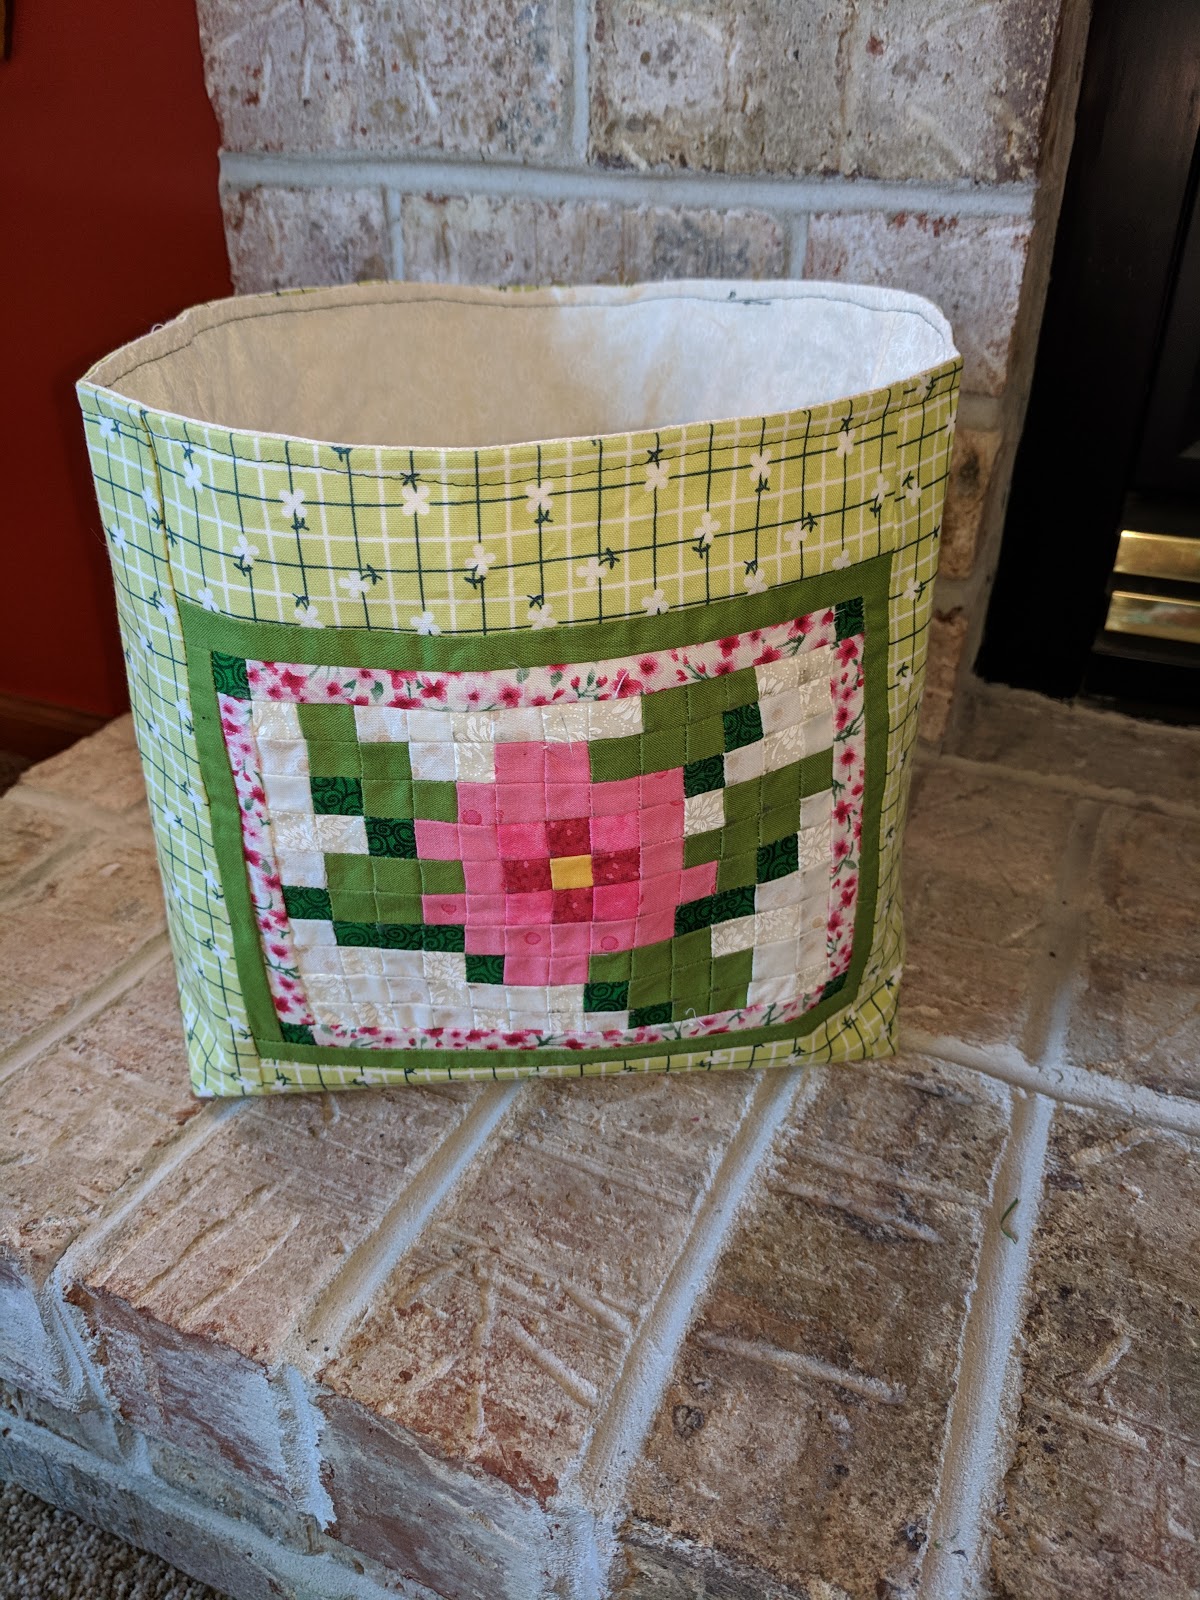
This basket measures approximately 10x10x7 inches and was made by me, in Slinger, Wisconsin.

This post is linked up at this week's Project Quilting Challenge.  Can't wait for next week's challenge!


Thursday, February 14, 2019

Seasonal Decorations and Pretty Pictures

I've been enjoying doing a little something different! I have been making these cute little "postcards."  They each measure about 4 x 6 and fit perfectly on this little clip frame.  They will be a gift for  friend.  Eventually, I will make  her one for each season/holiday, or about 10 in all, I think.  She has a cute little area in her house that she changes out for every season, and I hope she will use this frame there!


We were shopping at a craft fair together before Christmas and both saw a clip frame with a winter tree :postcard" at the same time.   She debated between purchasing it or a different item.  When she went with the other one, I grabbed it for myself, but decided to make a similar one for her.  I found a clip frame, and set to work making something similar to the one I'd purchased.  Well, as I was making that one,  realized that I could make up new designs, too!

These little guys are done without a pattern, are mostly hand sewn and are all made from scraps and things I have on hand.  I've been just tinkering around trying new stitches, and making it up as I go along.  It is so fun!  I'd like to make myself a set, and probably should just start making 2 postcards at a time.  But, as soon as I finish one I start itching to start the next design. So, perhaps I am meant to just have the one I bought at the craft fair.

I also wanted to share these pretty pictures of the Happy Thoughts Quilt.  I blogged about the quilt last week, but finally got to go out in the fresh snow and take some pictures when we had our 5th snow day of the year earlier this week.  The snow was so pretty, the temperatures were not crazy cold and I had quilt holders at my disposal!  There is just something so beautiful about quilts in the snow,, don't you think?


I'm going to link this post up at:

Needle And Thread Thursday @ My Quilt Infatuation

Saturday, February 09, 2019

Project Quilting 10.3 - Bigger Than A Breadbox

Oh, I am loving these Project Quilting Challenges!  This week's challenge was "Bigger Than A Breadbox."  The stipulation was that our projects needed to have one measurement larger than 8 inches and one measurement larger than 17 inches.

                                              PQ-10-3-bread-box


My first inclination was to do something box like.  Something with depth and dimensions.  Maybe a tote or sewing machine cover.  I've made totes and bags before, though, and I knew that I need to do them in really short sessions as I tend to get overwhelmed.  A sewing machine cover was a good thought, but, I know myself.  I'd leave it crumpled up on the floor when not sewing, rather than using it.  I wanted something useful.  Something I wanted to make, anyway..  I looked back at my list of sewing goals that I'd made just before the first of the year.  One of my goals was to make table runners for each season. 
Here's how our table looked at Christmas.  I made a super quick table runner from a kit I had won a while ago.  I just LOVE this table!

We purchased a beautiful new kitchen table last summer, and it makes me really happy to have an hand made runner on it.  The table was built by a pair of brothers who have made a business our of reclaiming barn wood and building one of a kind furniture.  I love everything about that! The stories, the work and the effort trapped in that wood, the time and the love spent preparing it, and the meals shared around it...it all makes for a really special table, and I want it to be topped with a little bit of my own work.

Well, a table runner can certainly be larger than a breadbox!  So here it is!  I went with a vaguely  Valentine's theme, but in colors that suit my kitchen, rather than pinks and reds.


I used mini charms from some packs that have been on my shelf for quite a while to make some fun nine patches.  A few more pre-cut charm squares were used to make the hearts.  The backing and binding, too, were on my shelves, purchased years ago for long forgotten purposes!  I love that I'm using up things I have rather than buying anything new for these challenges!

I tried out a couple stitches on my machine that I haven't used before, for the raw edge applique,  This was fun, and I learned a few things I wouldn't necessarily do again!  I intended to finish the binding by hand like a usually do, but a raging migraine this afternoon told me this might be a good time to just machine stitch it.  Eh.  I won't do that again, either, at least not with a migraine.  I might actually take that stitching out and try again when I can think straight.  And, I might try glue basting it.  I wish I had taken the time to try that this time.


But, you know what?  This is done!  I have a finished table runner I can leave on my table through Spring if I want to!  And I finished it in time to enter the challenge for a third week!


I am so happy to have 4 finishes in for the year.  Three PQ challenges and the Happy Thoughts Quilt (see previous post if you want to see it!). I feel like that's more than I sometimes have in a whole year!  The energy from one finish fuels the next project, and I just keep going!  I am also settling into a rhythm of sewing almost every day which helps.  These PQ challenges are also teaching me that I can't hide behind the "I don't have time" mindset.  I DO have time.  I just have to use it!  Thanks Kim and the PQ team for this fun way to grow both my skills and my sewing outlook!

Monday, February 04, 2019

Happy Thoughts

I am very happy to share a finish!  This quilt has been a year in the making, and I am so glad it's finally
done and can be give to its intended recipient.  Plus, it's on my First Quarter Finish Along List, so I get
to check something off!


This quilt was started last January as a gift for a friend who had recently been diagnosed with breast
cancer.  It's so hard to know what to say when there just aren't words, so a quilt to cuddle up in
seemed like the best way to say what I was feeling.  She is in a very different place now than she was
a year ago. She has come through the storm and is finding her way to a new normal. So, while this
quilt was intended to provide comfort, it will now be given as a celebration! It' a little over-due, I know,
but it's never the wrong time to give a quilt.


The pattern is named "Happy Thoughts" and was created by Allison of Woodberry Way.  It was the name that caught my attention first. My friend was certainly in need of some Happy thoughts as she faced chemotherapy and then radiation.  But, beyond the name, I was really drawn to the modern cheery look. The block construction is pretty straight forward, too, and I thought it would go together quickly.  Ha. Famous last words. Actually, the blocks were pretty simple to piece, there are just a lot of them! I would work on this exclusively for a while, then something would get in the way. . There were times when I just couldn't sew, even when that was what I needed most. Life is just like that, sometimes.


I kept at it and pieced the blocks a few at a time, finishing the last one in mid August.  I posted a picture
of them on my design wall on Instagram, and the caption said I hoped to get the top pieced and quilted
before school started!  Ha! More famous last words!


I didn't touch it again until sometime in November.  A new job, costumes for two musicals and our usual
crazy busy life kept me occupied.  But, by the end of December it was pieced with borders added. On
New Year's Day I moved the kitchen table, grabbed some painter's tape and basting spray and made a
quilt sandwich!  


I decided on simple, straight line quilting, across the width of the quilt.  I really love the look of it. It
seems to complement the modern style of the blocks, and it was surprisingly fun to quilt. I set a goal of
doing a minimum of 5 trips across the quilt each time ! sat down to sew.  I found that I usually did
more, and it only took 12 sessions to get it done!


Monday January 21 was a scheduled day off of school, and I had long been envisioning spending the
day  under this quilt as I hand stitched the binding in front of a Hallmark movie or two. I was SO
looking forward to it.  But, that ended up being the day my daughter was admitted to the hospital.
So, the binding was finished in the hospital recliner with several episodes of  Nailed It instead of on my
couch with a cheesy romance. But, it got done. I added a quick label, and now its ready to be given.'


While I knew that it would take me some time to piece a top and get it quilted, I certainly never
intended it to be a year long process. But, as I went back through my photos looking for some pictures
of this quilt in process, I noticed that a LOT of life happened during the making of it.  This quilt at
many times was a sort of therapy for me. It's been a difficult year as I've been struggling with anxiety
and coming to terms with my mom's diagnosis of dementia. Most makers find solace in the process of
creating, and I certainly found that, time and time again over the last 12 months as I took out the
pieces of this quilt to work.  I might have started out feeling stressed or sad or worried. But within a
short time, I felt myself relaxing into the rhythm of the work, and ended up feeling calm and comforted.


Happy Thoughts.  It's a fitting name for a quilt that helped to calm and comfort its maker and a fitting
name for a quilt given to celebrate the beginning of a happy new chapter for my friend.

I'm really proud of this finish, so I'm going to link it up to Finished or not Friday over at Busy Hands
Quilts and Can I Get A Whoop Whoop at Confessions of a Fabric Addict AND the Brag About Your
Beauties Pageant at From Bolt To Beauty.
If you're stopping by from one of those, please leave a comment! Now that I'm blogging somewhat
consistently again, I'd like to jump back into the community of commentors and commenting!
That's the fun stuff, after all!

I am editing to add a "glamour shot" of this pretty quilt, from her photo shoot in the snow:


P.S. I apologize for the wonky spacing and formatting in this post. I had it all typed but lost my internet
connection, copied it into a word document and then later pasted it into a new post. That,
apparently isn't a good idea. I'm not starting over for a third time...so, this post is just a bit off.
Oh well!